Most tutorials show you how to build a to-do app. This guide shows you how a senior developer starts a real project — the decisions they make before writing a single line of business logic, the tools they pick, and why.
If you follow this guide, you'll have a full-stack Next.js project that's ready to scale, easy to maintain, and set up the way teams at real companies do it.
The mindset shift
Juniors ask: "what framework should I use?"
Seniors ask: "what problems am I solving, and what's the minimum complexity that solves them?"
The decisions in this guide are opinionated and intentional. Every choice has a reason. When you understand the reasons, you can adapt the stack to your own constraints.
The 2026 stack
| Layer | Choice | Why |
|---|---|---|
| Framework | Next.js 15 (App Router) | SSR + RSC + API routes in one |
| Language | TypeScript (strict) | Catches bugs before runtime |
| Styling | Tailwind CSS v4 | Fastest UI iteration |
| Components | shadcn/ui | Copy-paste, you own the code |
| Database | PostgreSQL via Neon | Serverless, free tier, branching |
| ORM | Drizzle | Type-safe, SQL-like, fast |
| Auth | Clerk | Best DX for most projects |
| Validation | Zod | Runtime + compile-time safety |
| Forms | React Hook Form + Zod | Performance + validation |
| Linting/Format | Biome | ESLint + Prettier in one, 100x faster |
| Env vars | t3-env | Type-safe env variables |
| AI assistant | Claude Code | Best for full-stack tasks |
This isn't the only valid stack. It's the one with the best tradeoffs for a project that needs to ship fast and scale later.
Step 1 — Initialize the project correctly
npx create-next-app@latest my-app \
  --typescript \
  --tailwind \
  --eslint \
  --app \
  --src-dir \
  --import-alias "@/*"

cd my-app
The --src-dir flag puts everything in src/ — this keeps the root clean and separates app code from config files.
Enable strict TypeScript immediately
Open tsconfig.json and make sure these are set:
{
  "compilerOptions": {
    "strict": true,
    "noUncheckedIndexedAccess": true,
    "noImplicitReturns": true,
    "exactOptionalPropertyTypes": true
  }
}
noUncheckedIndexedAccess is the one most people miss. It forces you to handle array[0] being potentially undefined. This prevents an entire class of runtime bugs.
Enabling strict TypeScript after you have 10,000 lines of code is a nightmare. Do it on day one — it costs nothing upfront and saves hours of debugging later.
Step 2 — Replace ESLint + Prettier with Biome
Biome does what ESLint and Prettier do, in one tool, 100x faster.
npm install --save-dev @biomejs/biome
npx biome init
Remove ESLint (it came with create-next-app):
npm uninstall eslint eslint-config-next
rm .eslintrc.json
Configure biome.json:
{
  "$schema": "https://biomejs.dev/schemas/1.9.0/schema.json",
  "organizeImports": {
    "enabled": true
  },
  "linter": {
    "enabled": true,
    "rules": {
      "recommended": true,
      "correctness": {
        "noUnusedVariables": "error",
        "noUnusedImports": "error"
      }
    }
  },
  "formatter": {
    "enabled": true,
    "indentStyle": "space",
    "indentWidth": 2,
    "lineWidth": 100
  },
  "javascript": {
    "formatter": {
      "quoteStyle": "single",
      "trailingCommas": "es5",
      "semicolons": "asNeeded"
    }
  }
}
Add scripts to package.json:
{
  "scripts": {
    "lint": "biome lint ./src",
    "format": "biome format --write ./src",
    "check": "biome check --write ./src"
  }
}
Step 3 — Folder structure that scales
Most beginners use a flat structure that becomes unmanageable at 20+ files. Seniors use feature-based organization.
src/
├── app/                    # Next.js App Router
│   ├── (auth)/            # Route group — auth pages
│   │   ├── sign-in/
│   │   └── sign-up/
│   ├── (dashboard)/       # Route group — protected pages
│   │   ├── layout.tsx     # Protected layout with auth check
│   │   └── dashboard/
│   ├── api/               # API routes
│   │   ├── webhooks/
│   │   └── [...]/
│   ├── layout.tsx
│   └── page.tsx
├── components/
│   ├── ui/                # shadcn/ui components (auto-generated)
│   └── [feature]/         # Feature-specific components
├── lib/
│   ├── auth.ts            # Auth config and helpers
│   ├── db.ts              # Database client
│   ├── env.ts             # Type-safe env vars
│   └── utils.ts           # Shared utilities
├── db/
│   ├── schema.ts          # Drizzle schema (all tables)
│   └── migrations/        # Generated migration files
├── hooks/                 # Custom React hooks
├── types/                 # Shared TypeScript types
└── actions/               # Server Actions
Route groups with (parentheses) let you apply different layouts to different sections without affecting the URL. The auth group gets an unauthenticated layout, the dashboard group gets the sidebar layout — both live at the root URL level.
Step 4 — Type-safe environment variables
The biggest source of runtime errors in production: process.env.SOMETHING being undefined when you thought it was set.
npm install @t3-oss/env-nextjs zod// src/lib/env.ts
import { createEnv } from '@t3-oss/env-nextjs'
import { z } from 'zod'
export const env = createEnv({
server: {
DATABASE_URL: z.string().url(),
CLERK_SECRET_KEY: z.string().min(1),
CLERK_WEBHOOK_SECRET: z.string().min(1),
STRIPE_SECRET_KEY: z.string().min(1).optional(),
NODE_ENV: z.enum(['development', 'test', 'production']),
},
client: {
NEXT_PUBLIC_CLERK_PUBLISHABLE_KEY: z.string().min(1),
NEXT_PUBLIC_APP_URL: z.string().url(),
},
runtimeEnv: {
DATABASE_URL: process.env.DATABASE_URL,
CLERK_SECRET_KEY: process.env.CLERK_SECRET_KEY,
CLERK_WEBHOOK_SECRET: process.env.CLERK_WEBHOOK_SECRET,
STRIPE_SECRET_KEY: process.env.STRIPE_SECRET_KEY,
NODE_ENV: process.env.NODE_ENV,
NEXT_PUBLIC_CLERK_PUBLISHABLE_KEY: process.env.NEXT_PUBLIC_CLERK_PUBLISHABLE_KEY,
NEXT_PUBLIC_APP_URL: process.env.NEXT_PUBLIC_APP_URL,
},
})Now import env instead of process.env everywhere:
// Before (unsafe — could be undefined at runtime)
const db = new Client({ connectionString: process.env.DATABASE_URL })

// After (validated at build time — fails fast if missing)
import { env } from '@/lib/env'
const db = new Client({ connectionString: env.DATABASE_URL })
If a required env var is missing, the build fails — not a silent runtime crash at 3 AM.
Step 5 — Database with Drizzle + Neon
Neon is serverless PostgreSQL with a generous free tier and database branching (like git branches for your DB).
npm install drizzle-orm @neondatabase/serverless
npm install --save-dev drizzle-kit
// src/lib/db.ts
import { neon } from '@neondatabase/serverless'
import { drizzle } from 'drizzle-orm/neon-http'
import * as schema from '@/db/schema'
import { env } from '@/lib/env'
const sql = neon(env.DATABASE_URL)
export const db = drizzle(sql, { schema })// src/db/schema.ts
import { pgTable, text, timestamp, boolean } from 'drizzle-orm/pg-core'
import { createId } from '@paralleldrive/cuid2'
// Always use cuid2 for IDs — not auto-increment integers
// cuid2 is URL-safe, sortable, and collision-resistant
export const users = pgTable('users', {
id: text('id').primaryKey().$defaultFn(() => createId()),
clerkId: text('clerk_id').unique().notNull(),
email: text('email').notNull(),
name: text('name'),
plan: text('plan').default('free').notNull(),
createdAt: timestamp('created_at').defaultNow().notNull(),
updatedAt: timestamp('updated_at').defaultNow().$onUpdate(() => new Date()).notNull(),
deletedAt: timestamp('deleted_at'), // soft delete — never hard delete users
})
export const projects = pgTable('projects', {
id: text('id').primaryKey().$defaultFn(() => createId()),
name: text('name').notNull(),
description: text('description'),
ownerId: text('owner_id').notNull().references(() => users.id, { onDelete: 'cascade' }),
isPublic: boolean('is_public').default(false).notNull(),
createdAt: timestamp('created_at').defaultNow().notNull(),
updatedAt: timestamp('updated_at').defaultNow().$onUpdate(() => new Date()).notNull(),
})// drizzle.config.ts
import { defineConfig } from 'drizzle-kit'
import { env } from './src/lib/env'
export default defineConfig({
schema: './src/db/schema.ts',
out: './src/db/migrations',
dialect: 'postgresql',
dbCredentials: { url: env.DATABASE_URL },
strict: true,
verbose: true,
})npm install @paralleldrive/cuid2
npx drizzle-kit generate # create migration files
npx drizzle-kit migrate # apply to databasepush applies changes directly without migration files. Use generate + migrate always — it gives you an auditable history and safe rollbacks.
Step 6 — Authentication with Clerk
npm install @clerk/nextjs// src/middleware.ts
import { clerkMiddleware, createRouteMatcher } from '@clerk/nextjs/server'
const isPublicRoute = createRouteMatcher([
'/',
'/sign-in(.*)',
'/sign-up(.*)',
'/api/webhooks(.*)',
'/blog(.*)',
])
export default clerkMiddleware(async (auth, req) => {
if (!isPublicRoute(req)) {
await auth.protect()
}
})
export const config = {
matcher: ['/((?!_next|[^?]*\\.(?:html?|css|js(?!on)|jinja2|txt|xml|ico|webp|avif|jpg|jpeg|gif|svg|ttf|woff2?|mp4|mp3|ogg|pdf|zip|gz)).*)', '/(api|trpc)(.*)'],
}// src/lib/auth.ts
import { auth, currentUser } from '@clerk/nextjs/server'
import { db } from '@/lib/db'
import { users } from '@/db/schema'
import { eq } from 'drizzle-orm'
export async function getAuthUser() {
const { userId } = await auth()
if (!userId) return null
// Get from your DB, not Clerk — your DB has your business data
const user = await db.query.users.findFirst({
where: eq(users.clerkId, userId),
})
// Race condition: user in Clerk but not yet in your DB (webhook lag)
if (!user) {
const clerkUser = await currentUser()
if (!clerkUser) return null
// Create on the fly — idempotent
const [created] = await db
.insert(users)
.values({
clerkId: userId,
email: clerkUser.primaryEmailAddress?.emailAddress ?? '',
name: clerkUser.fullName,
})
.onConflictDoNothing()
.returning()
return created ?? null
}
return user
}
export async function requireAuth() {
const user = await getAuthUser()
if (!user) throw new Error('Unauthorized')
return user
}Step 7 — UI components with shadcn/ui
shadcn/ui isn't a component library you install — it's a collection of components you copy into your project. You own the code, you can modify anything.
npx shadcn@latest initChoose: Default style, slate base color, CSS variables.
Add components as you need them:
npx shadcn@latest add button card input label form dialogThey land in src/components/ui/ — fully editable. For a deeper dive into theming, form integration, and dark mode patterns, see the complete shadcn/ui guide.
Step 8 — Forms with React Hook Form + Zod
Never use uncontrolled <form> with FormData for complex forms. React Hook Form gives you validation, error states, and loading states with minimal code.
npm install react-hook-form @hookform/resolvers zod// Example: create project form
'use client'
import { useForm } from 'react-hook-form'
import { zodResolver } from '@hookform/resolvers/zod'
import { z } from 'zod'
const createProjectSchema = z.object({
name: z.string().min(1, 'Name is required').max(50, 'Max 50 characters'),
description: z.string().max(200).optional(),
isPublic: z.boolean().default(false),
})
type CreateProjectInput = z.infer<typeof createProjectSchema>
export function CreateProjectForm() {
const form = useForm<CreateProjectInput>({
resolver: zodResolver(createProjectSchema),
defaultValues: { name: '', isPublic: false },
})
async function onSubmit(data: CreateProjectInput) {
const result = await createProject(data) // Server Action
if (result.error) {
form.setError('name', { message: result.error })
return
}
// success handling
}
return (
<form onSubmit={form.handleSubmit(onSubmit)}>
{/* form fields */}
</form>
)
}The schema validates both on the client (instant feedback) and on the server (security). Same schema, both places.
Step 9 — Server Actions for mutations
Forget API routes for simple mutations. Server Actions are TypeScript functions that run on the server, called directly from client components.
// src/actions/projects.ts
'use server'
import { revalidatePath } from 'next/cache'
import { z } from 'zod'
import { db } from '@/lib/db'
import { projects } from '@/db/schema'
import { requireAuth } from '@/lib/auth'

const createProjectSchema = z.object({
  name: z.string().min(1).max(50),
  description: z.string().max(200).optional(),
  isPublic: z.boolean().default(false),
})

export async function createProject(input: unknown) {
  const user = await requireAuth()

  const parsed = createProjectSchema.safeParse(input)
  if (!parsed.success) {
    return { error: parsed.error.errors[0]?.message ?? 'Invalid input' }
  }

  try {
    const [project] = await db
      .insert(projects)
      .values({ ...parsed.data, ownerId: user.id })
      .returning()

    revalidatePath('/dashboard')
    return { data: project }
  } catch {
    return { error: 'Failed to create project' }
  }
}Server Actions are public endpoints — anyone can call them with arbitrary data. Always validate with Zod, always check auth. Never trust the input.
Step 10 — Using AI (Claude Code) the right way
Claude Code is a terminal AI assistant that reads your codebase and writes code. Used correctly, it's a 3-5x speed multiplier. Used incorrectly, it generates code you don't understand and can't maintain.
The senior dev approach to AI:
# Install Claude Code
npm install -g @anthropic-ai/claude-code
claude
Do this — works great:
- "Add a
descriptioncolumn to the projects table and generate the migration" - "Write a Server Action that deletes a project by ID, checking that the user owns it"
- "Add rate limiting to the
/api/generateroute using Upstash" - "Write the Drizzle query to get all projects for a user, ordered by updatedAt"
Don't do this — creates problems:
- "Build me a complete project management app" (too vague, too large)
- "Fix all the TypeScript errors" (without explaining the context)
- Blindly copying generated code without reading it
The best pattern: tell Claude what to build, read what it writes, understand it, then move on. If you can't explain the code it wrote, you have a problem.
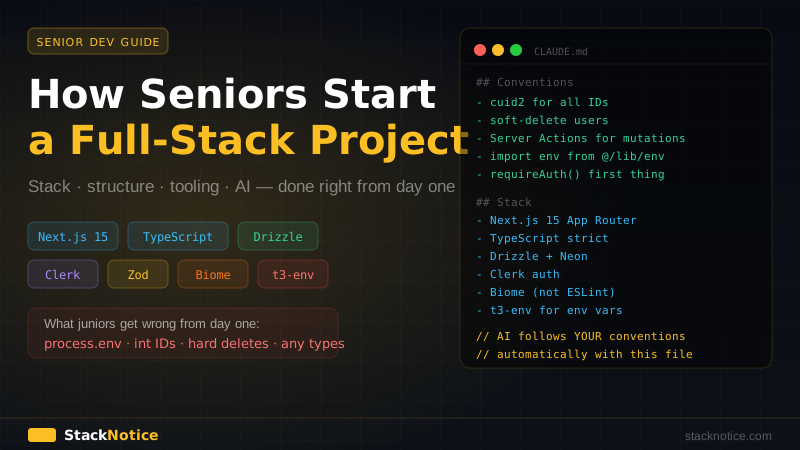
CLAUDE.md — your project's AI instructions:
Create a CLAUDE.md at the root of your project:
# Project — CLAUDE.md

## Stack
- Next.js 15 App Router
- TypeScript strict mode
- Drizzle ORM + Neon PostgreSQL
- Clerk for auth
- Zod for validation
- Biome for linting

## Conventions
- Use `cuid2` for all IDs, never auto-increment
- Always soft-delete users (deletedAt), never hard delete
- Server Actions for mutations, not API routes
- Import env vars from `@/lib/env`, never process.env directly
- Use `requireAuth()` at the top of every protected Server Action
- Return `{ data }` or `{ error }` from Server Actions, never throw

## File structure
- Components in `src/components/[feature]/`
- Server Actions in `src/actions/[feature].ts`
- DB schema in `src/db/schema.ts`
This file tells Claude Code how your project is structured. Every suggestion it makes will follow your conventions automatically.
What seniors skip (and you should too)
No unit tests at the start. Tests are valuable — but at the beginning, your schema and API shape changes constantly. Writing tests for code that's about to be rewritten wastes time. Add tests when a feature is stable.
No Redux or Zustand at the start. React's built-in state + Server Components + React Query handle 90% of state management needs. Add a global store when you hit a real problem, not before.
No microservices. Start with a monolith. Split it later when you have a real reason (team size, independent scaling). Premature microservices are the #1 cause of over-engineered MVPs.
No Docker in development. Run the dev server directly. Add Docker when you need consistent environments across a team or when deploying to a non-Vercel platform.
No CI/CD on day one. Vercel auto-deploys on push. That's your CI/CD for the first 6 months. Add GitHub Actions when you need custom steps (migrations, test gates, multi-environment).
Common junior mistakes — and the fix
| Mistake | Fix |
|---|---|
process.env.X everywhere | t3-env — fails at build time if missing |
| Auto-increment integer IDs | cuid2 — URL-safe, no sequential exposure |
| Hard-delete users | deletedAt soft-delete — data is forever |
Mutations in useEffect | Server Actions — no race conditions |
any type everywhere | Enable strict TS — fix errors as you go |
One giant schema.ts | Split by domain when it exceeds 200 lines |
console.log debugging | pino structured logger from day one |
| Deploy first, migrate after | Migrate first, always — avoid schema mismatch |
The 30-minute setup checklist
npx create-next-app@latest with TypeScript, Tailwind, App Router, src dir.
Add noUncheckedIndexedAccess, noImplicitReturns, exactOptionalPropertyTypes to tsconfig.
Remove ESLint, install Biome, configure formatter and linter rules.
Define all env vars with Zod schemas. Never use process.env again.
Create DB client, write initial schema with cuid2 IDs, run first migration.
Install, add middleware, create getAuthUser() and requireAuth() helpers.
Init shadcn, add the 5-6 components you know you'll need.
Document your stack, conventions, and file structure. This is your AI instructions file.
What this gives you
After 30 minutes of setup, you have:
- Type-safe everything — DB, env vars, API inputs, form validation
- Authentication that just works
- A database that won't break your app when you change the schema
- AI assistance that follows your conventions
- Zero config debt — Biome handles formatting automatically
The rest is business logic. That's the part you actually want to be writing.
Related guides in this series
- The Tech Stack I'd Choose in 2026 — deeper reasoning behind these choices
- Database Migrations Without Downtime — how to evolve your schema safely
- Auth in Production with Clerk — webhooks, RBAC, and edge cases
- Claude Code Complete Guide — getting more out of AI assistance