If you know React and TypeScript, you already know 80% of what you need to build a real mobile app. Expo closes the remaining gap — it abstracts native build tooling, provides a file-based router, and lets you deploy over-the-air updates without going through App Store review. With the React Native New Architecture now stable in 2026, performance is no longer a valid objection.
This guide is written for web developers. It skips the "what is a component" basics and focuses on what's different from a web app and where the real complexity lives.
What You're Actually Getting
React Native renders native UI components — not WebViews, not HTML. A <View> becomes a UIView on iOS and an android.view.View on Android. The JavaScript runs in a separate thread and communicates with native via the JSI bridge (New Architecture replaces the old async bridge with synchronous JSI calls, which is why performance is much better in 2026).
Expo sits on top of React Native and provides:
- Pre-built native modules (camera, push notifications, file system, etc.) without writing Swift or Kotlin
- Expo Router — file-based routing identical to Next.js App Router
- EAS (Expo Application Services) — cloud builds and OTA updates
- Expo Go — scan a QR code and preview your app instantly during development
Setting Up
npx create-expo-app@latest my-app --template blank-typescript
cd my-app
npx expo start
Scan the QR code with Expo Go (iOS/Android) to preview instantly. No Xcode or Android Studio needed for development — only for final production builds.
Project structure:
my-app/
  app/
    (tabs)/
      _layout.tsx     ← tab navigator
      index.tsx       ← / (Home tab)
      explore.tsx     ← /explore tab
    _layout.tsx       ← root layout
    +not-found.tsx    ← 404
  components/
  constants/
  hooks/
  assets/
  app.json            ← Expo config
Current stable versions: Expo SDK 52, React Native 0.76, New Architecture enabled by default.
Expo Router: File-Based Routing
Expo Router v4 uses the same file conventions as Next.js App Router — if you know one, you know the other:
app/
  _layout.tsx           ← root layout (Stack navigator)
  index.tsx             ← / route
  (tabs)/
    _layout.tsx         ← Tab navigator
    index.tsx           ← /  (first tab)
    profile.tsx         ← /profile (second tab)
  (auth)/
    login.tsx           ← /login (outside tabs)
    signup.tsx          ← /signup
  posts/
    [id].tsx            ← /posts/:id (dynamic route)
    [id]/
      comments.tsx      ← /posts/:id/comments
  +not-found.tsx        ← fallback
Parentheses (tabs) create layout groups without affecting the URL path — same as Next.js.
Root layout
// app/_layout.tsx
import { Stack } from 'expo-router'
import { useColorScheme } from 'react-native'

export default function RootLayout() {
  const colorScheme = useColorScheme()

  return (
    <Stack
      screenOptions={{
        headerStyle: { backgroundColor: colorScheme === 'dark' ? '#1a1a2e' : '#ffffff' },
        headerTintColor: colorScheme === 'dark' ? '#fff' : '#000',
      }}
    >
      <Stack.Screen name="(tabs)" options={{ headerShown: false }} />
      <Stack.Screen name="(auth)/login" options={{ title: 'Log in', presentation: 'modal' }} />
      <Stack.Screen name="+not-found" />
    </Stack>
  )
}
Tab navigator
// app/(tabs)/_layout.tsx
import { Tabs } from 'expo-router'
import { Ionicons } from '@expo/vector-icons'

export default function TabLayout() {
  return (
    <Tabs
      screenOptions={{
        tabBarActiveTintColor: '#6366f1',
        tabBarInactiveTintColor: '#9ca3af',
      }}
    >
      <Tabs.Screen
        name="index"
        options={{
          title: 'Home',
          tabBarIcon: ({ color, size }) => (
            <Ionicons name="home-outline" size={size} color={color} />
          )
        }}
      />
      <Tabs.Screen
        name="profile"
        options={{
          title: 'Profile',
          tabBarIcon: ({ color, size }) => (
            <Ionicons name="person-outline" size={size} color={color} />
          )
        }}
      />
    </Tabs>
  )
}
Dynamic routes and navigation
// app/posts/[id].tsx
import { useLocalSearchParams, useRouter, Stack } from 'expo-router'
import { View, Text, Pressable, StyleSheet } from 'react-native'

export default function PostDetail() {
  const { id } = useLocalSearchParams<{ id: string }>()
  const router = useRouter()

  return (
    <>
      <Stack.Screen options={{ title: `Post ${id}` }} />
      <View style={styles.container}>
        <Text style={styles.title}>Post ID: {id}</Text>
        <Pressable
          style={styles.button}
          onPress={() => router.push(`/posts/${id}/comments`)}
        >
          <Text style={styles.buttonText}>View Comments</Text>
        </Pressable>
        <Pressable onPress={() => router.back()}>
          <Text>Go Back</Text>
        </Pressable>
      </View>
    </>
  )
}

const styles = StyleSheet.create({
  container: { flex: 1, padding: 16 },
  title: { fontSize: 24, fontWeight: 'bold', marginBottom: 16 },
  button: {
    backgroundColor: '#6366f1',
    padding: 12,
    borderRadius: 8,
    alignItems: 'center'
  },
  buttonText: { color: '#fff', fontWeight: '600' }
})
Styling: NativeWind vs StyleSheet
React Native doesn't have CSS. You have two main options:
StyleSheet (built-in): typed, performant, no build step. Syntax is CSS-like but camelCase and no cascade:
import { StyleSheet } from 'react-native'

const styles = StyleSheet.create({
  container: {
    flex: 1,
    backgroundColor: '#fff',
    padding: 16,
  },
  card: {
    backgroundColor: '#f9fafb',
    borderRadius: 12,
    padding: 16,
    marginBottom: 12,
    shadowColor: '#000',
    shadowOffset: { width: 0, height: 2 },
    shadowOpacity: 0.1,
    shadowRadius: 4,
    elevation: 3,  // Android shadow
  },
  title: {
    fontSize: 18,
    fontWeight: '600',
    color: '#111827',
  }
})
NativeWind (Tailwind for React Native): If you live in Tailwind, NativeWind brings the exact same utility classes to React Native:
npm install nativewind tailwindcss
npx tailwindcss init
// tailwind.config.js
module.exports = {
content: ['./app/**/*.{js,ts,jsx,tsx}', './components/**/*.{js,ts,jsx,tsx}'],
presets: [require('nativewind/preset')],
}// babel.config.js
module.exports = {
presets: ['babel-preset-expo'],
plugins: ['nativewind/babel'],
}import { View, Text, Pressable } from 'react-native'
import { styled } from 'nativewind'
const StyledView = styled(View)
const StyledText = styled(Text)
const StyledPressable = styled(Pressable)
export function Card({ title, subtitle }: { title: string; subtitle: string }) {
return (
<StyledView className="bg-white rounded-xl p-4 mb-3 shadow-sm">
<StyledText className="text-lg font-semibold text-gray-900">{title}</StyledText>
<StyledText className="text-sm text-gray-500 mt-1">{subtitle}</StyledText>
</StyledView>
)
}Pick one and stick to it. Mixing StyleSheet and NativeWind in the same component creates confusion.
Data Fetching with TanStack Query
TanStack Query works identically on React Native — same API as web:
npm install @tanstack/react-query// app/_layout.tsx — add QueryClientProvider
import { QueryClient, QueryClientProvider } from '@tanstack/react-query'
const queryClient = new QueryClient({
defaultOptions: {
queries: {
staleTime: 1000 * 60 * 5, // 5 minutes
retry: 2,
}
}
})
export default function RootLayout() {
return (
<QueryClientProvider client={queryClient}>
<Stack>
{/* ... */}
</Stack>
</QueryClientProvider>
)
}// hooks/usePosts.ts
import { useQuery, useMutation, useQueryClient } from '@tanstack/react-query'
interface Post {
id: string
title: string
body: string
createdAt: string
}
async function fetchPosts(): Promise<Post[]> {
const res = await fetch('https://api.yourapp.com/posts')
if (!res.ok) throw new Error('Failed to fetch posts')
return res.json()
}
export function usePosts() {
return useQuery({
queryKey: ['posts'],
queryFn: fetchPosts,
})
}
export function useCreatePost() {
const queryClient = useQueryClient()
return useMutation({
mutationFn: async (data: { title: string; body: string }) => {
const res = await fetch('https://api.yourapp.com/posts', {
method: 'POST',
headers: { 'Content-Type': 'application/json' },
body: JSON.stringify(data)
})
return res.json()
},
onSuccess: () => {
queryClient.invalidateQueries({ queryKey: ['posts'] })
}
})
}// app/(tabs)/index.tsx — FlatList with pull-to-refresh
import { FlatList, RefreshControl, View, Text, ActivityIndicator } from 'react-native'
import { usePosts } from '~/hooks/usePosts'
export default function HomeScreen() {
const { data: posts, isLoading, isError, refetch, isRefetching } = usePosts()
if (isLoading) {
return (
<View style={{ flex: 1, justifyContent: 'center', alignItems: 'center' }}>
<ActivityIndicator size="large" color="#6366f1" />
</View>
)
}
if (isError) {
return <Text>Failed to load posts</Text>
}
return (
<FlatList
data={posts}
keyExtractor={(item) => item.id}
renderItem={({ item }) => (
<View style={{ padding: 16, borderBottomWidth: 1, borderBottomColor: '#e5e7eb' }}>
<Text style={{ fontSize: 16, fontWeight: '600' }}>{item.title}</Text>
<Text style={{ color: '#6b7280', marginTop: 4 }}>{item.body}</Text>
</View>
)}
refreshControl={
<RefreshControl refreshing={isRefetching} onRefresh={refetch} />
}
contentContainerStyle={{ paddingBottom: 100 }}
/>
)
}FlatList is the React Native equivalent of a virtualized list — use it instead of map() for any list that could be long. It only renders items in the viewport.
Auth: Secure Token Storage
Never store auth tokens in AsyncStorage — it's not encrypted. Use expo-secure-store instead:
npx expo install expo-secure-store// lib/auth.ts
import * as SecureStore from 'expo-secure-store'
import { router } from 'expo-router'
const TOKEN_KEY = 'auth_token'
export async function saveToken(token: string): Promise<void> {
await SecureStore.setItemAsync(TOKEN_KEY, token)
}
export async function getToken(): Promise<string | null> {
return SecureStore.getItemAsync(TOKEN_KEY)
}
export async function deleteToken(): Promise<void> {
await SecureStore.deleteItemAsync(TOKEN_KEY)
}
export async function logout(): Promise<void> {
await deleteToken()
router.replace('/(auth)/login')
}// hooks/useAuth.ts
import { useEffect, useState } from 'react'
import { getToken } from '~/lib/auth'
export function useAuth() {
const [token, setToken] = useState<string | null>(null)
const [isLoading, setIsLoading] = useState(true)
useEffect(() => {
getToken().then((t) => {
setToken(t)
setIsLoading(false)
})
}, [])
return { token, isAuthenticated: !!token, isLoading }
}// app/(tabs)/_layout.tsx — protect tabs
import { Redirect } from 'expo-router'
import { useAuth } from '~/hooks/useAuth'
export default function TabLayout() {
const { isAuthenticated, isLoading } = useAuth()
if (isLoading) return null
if (!isAuthenticated) return <Redirect href="/(auth)/login" />
return (
<Tabs>{/* ... */}</Tabs>
)
}Forms with React Hook Form + Zod
Same library as web, same API:
npm install react-hook-form @hookform/resolvers zod// app/(auth)/login.tsx
import { Controller, useForm } from 'react-hook-form'
import { zodResolver } from '@hookform/resolvers/zod'
import { z } from 'zod'
import {
View, Text, TextInput, Pressable,
KeyboardAvoidingView, Platform, StyleSheet
} from 'react-native'
import { router } from 'expo-router'
import { saveToken } from '~/lib/auth'
const loginSchema = z.object({
email: z.string().email('Invalid email'),
password: z.string().min(8, 'Password must be at least 8 characters')
})
type LoginForm = z.infer<typeof loginSchema>
export default function LoginScreen() {
const { control, handleSubmit, formState: { errors, isSubmitting } } = useForm<LoginForm>({
resolver: zodResolver(loginSchema)
})
async function onSubmit(data: LoginForm) {
const res = await fetch('https://api.yourapp.com/auth/login', {
method: 'POST',
headers: { 'Content-Type': 'application/json' },
body: JSON.stringify(data)
})
if (!res.ok) return // handle error
const { token } = await res.json()
await saveToken(token)
router.replace('/(tabs)')
}
return (
<KeyboardAvoidingView
style={styles.container}
behavior={Platform.OS === 'ios' ? 'padding' : 'height'}
>
<Text style={styles.title}>Log in</Text>
<Controller
control={control}
name="email"
render={({ field: { onChange, onBlur, value } }) => (
<View style={styles.field}>
<TextInput
style={[styles.input, errors.email && styles.inputError]}
placeholder="Email"
keyboardType="email-address"
autoCapitalize="none"
onBlur={onBlur}
onChangeText={onChange}
value={value}
/>
{errors.email && <Text style={styles.error}>{errors.email.message}</Text>}
</View>
)}
/>
<Controller
control={control}
name="password"
render={({ field: { onChange, onBlur, value } }) => (
<View style={styles.field}>
<TextInput
style={[styles.input, errors.password && styles.inputError]}
placeholder="Password"
secureTextEntry
onBlur={onBlur}
onChangeText={onChange}
value={value}
/>
{errors.password && <Text style={styles.error}>{errors.password.message}</Text>}
</View>
)}
/>
<Pressable
style={[styles.button, isSubmitting && styles.buttonDisabled]}
onPress={handleSubmit(onSubmit)}
disabled={isSubmitting}
>
<Text style={styles.buttonText}>
{isSubmitting ? 'Logging in...' : 'Log in'}
</Text>
</Pressable>
</KeyboardAvoidingView>
)
}
const styles = StyleSheet.create({
container: { flex: 1, padding: 24, justifyContent: 'center' },
title: { fontSize: 28, fontWeight: '700', marginBottom: 32 },
field: { marginBottom: 16 },
input: {
borderWidth: 1, borderColor: '#d1d5db', borderRadius: 8,
padding: 12, fontSize: 16
},
inputError: { borderColor: '#ef4444' },
error: { color: '#ef4444', fontSize: 12, marginTop: 4 },
button: {
backgroundColor: '#6366f1', padding: 16,
borderRadius: 8, alignItems: 'center'
},
buttonDisabled: { opacity: 0.6 },
buttonText: { color: '#fff', fontWeight: '600', fontSize: 16 }
})KeyboardAvoidingView handles the keyboard covering the input — critical on iOS where the keyboard doesn't push the view up automatically.
Push Notifications with Expo
npx expo install expo-notifications expo-device// lib/notifications.ts
import * as Notifications from 'expo-notifications'
import * as Device from 'expo-device'
import { Platform } from 'react-native'
Notifications.setNotificationHandler({
handleNotification: async () => ({
shouldShowAlert: true,
shouldPlaySound: true,
shouldSetBadge: true,
})
})
export async function registerForPushNotifications(): Promise<string | null> {
if (!Device.isDevice) {
console.warn('Push notifications only work on physical devices')
return null
}
const { status: existingStatus } = await Notifications.getPermissionsAsync()
let finalStatus = existingStatus
if (existingStatus !== 'granted') {
const { status } = await Notifications.requestPermissionsAsync()
finalStatus = status
}
if (finalStatus !== 'granted') return null
if (Platform.OS === 'android') {
await Notifications.setNotificationChannelAsync('default', {
name: 'Default',
importance: Notifications.AndroidImportance.MAX,
})
}
const token = await Notifications.getExpoPushTokenAsync({
projectId: process.env.EXPO_PUBLIC_PROJECT_ID!
})
return token.data // send this to your backend
}Send the token to your API and use Expo's push service or a direct APNs/FCM integration to send notifications server-side.
Building for Production with EAS
EAS Build creates the actual .ipa (iOS) and .apk/.aab (Android) files in the cloud — no need for Xcode on macOS or Android Studio:
npm install -g eas-cli
eas login
eas build:configure
This creates eas.json:
{
  "cli": { "version": ">= 12.0.0" },
  "build": {
    "development": {
      "developmentClient": true,
      "distribution": "internal"
    },
    "preview": {
      "distribution": "internal",
      "android": { "buildType": "apk" }
    },
    "production": {
      "autoIncrement": true
    }
  },
  "submit": {
    "production": {}
  }
}
# Build for both platforms
eas build --platform all --profile production
# Submit to App Store and Google Play
eas submit --platform allOTA Updates (no App Store review)
The killer feature: push JavaScript updates directly to users without waiting for store review:
eas update --branch production --message "Fix login bug"The next time users open the app, they get the update automatically. Only native code changes (new Expo modules, SDK upgrades) require a new store submission.
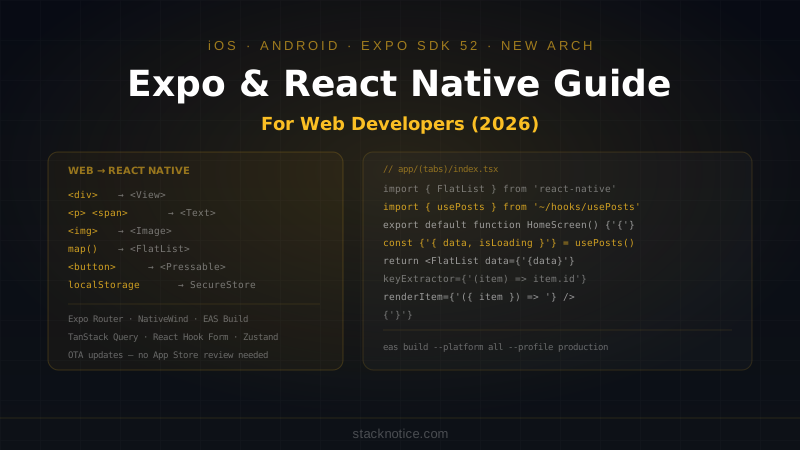
Key Differences from Web Development
| Web | React Native |
|---|---|
<div> | <View> |
<p>, <span> | <Text> (all text must be in Text) |
<img> | <Image> (requires explicit width/height) |
<ul> + map() | <FlatList> (virtualized) |
<button> | <Pressable> (more control over states) |
<input> | <TextInput> |
<a> / router.push | router.push() from expo-router |
| CSS | StyleSheet or NativeWind |
| localStorage | SecureStore (encrypted) |
| Browser APIs | Expo modules |
The biggest mental shift: there is no DOM, no CSS cascade, and no window. Everything is native views positioned with Flexbox (which is the default layout system — you don't need to write display: flex).
React Native uses Zustand for global state exactly as you would on web. TanStack Query and React Hook Form are drop-in — no React Native-specific versions needed.
What to Build First
The fastest path to a working app: start with Expo Router's file structure, get navigation working first, then add data fetching with TanStack Query, then auth. Don't fight with styling until the core flows work — StyleSheet defaults are fine for a prototype.
If you've been building Next.js apps, the learning curve here is flatter than you'd expect. The same component thinking, the same hooks, the same libraries. The surface area that's genuinely different — native APIs, StyleSheet, FlatList, KeyboardAvoidingView — is learnable in a week.